

Xero Setup Details
This page provides the detailed legacy setup guide for Smart Formulas sourced from Xero pay items. For a shorter overview, see Import Smart Formulas From Xero.Getting started
A summary of the steps is given below:1. Set up Pay Items in Xero
The steps below are for loading smart formulas to be used with ordinary earnings rates. You can also set up automatic and manual allowances. Pay Items are set up in Xero by navigating to Settings > Payroll Settings > Pay Items.General Setup
To enable a pay item for use as a Smart Formula, the name must use the following format:Number Name [DAY][PERIOD][][]
Example:
001 Ordinary Hours PT L1 [WEEKDAY][0800-1600][][]
Number
The Number should be three characters and zero filled between 1 and 999 (001, 010, 100 etc).Name
The Name should describe the pay item and can contain any characters (excluding [].) The length of the name is limited by the total length of the entire pay item being 50 characters.Day
Determines which day(s) the pay item applies to. Valid values are:- MON
- TUE
- WED
- THU
- FRI
- SAT
- SUN
- WEEKDAY
- WEEKEND
- EVERY
- Ranges (eg [MON-WED], [THU-FRI], etc)
- Selections ([MON,WED,FRI], [FRI,SAT] etc)
Period
The period can be defined with either:start_time - end_time; orstart_hour ~ end_hour.
start_time-end_time should be used for normal hours and the start_hour~end_hour for overtime and rates that are based on the number of hours worked rather than the time of day.
To define a period of time for which an earnings rate is applied, use the start_time - end_time option. Each time must be set using four digits and 24 hour clock.
Examples:
[0000-1300] = midnight to 1pm
[1400-1600] = 2pm to 4pm
[2000-0000] = 8pm to midnight
To define the number of hours for which an earnings rate is applied, use the start_hour ~ end hour. Each hour must be defined as an integer or a float of up to 2 decimal places.
Examples:
[0~7.6] = 0 to 7.6 hours
[7.6~9] = 7.6 to 9 hours
[9~24] = 9 to 24 hours
The above rules are applied on a daily basis and so can be used to determine rates for daily overtime.
Weekly Overtime
To create a formula that is applied based on weekly hours instead of daily, a WOT parameter can be added to indicate this:RDO / Rostered Days Off
Period rules can also be used to deduct hours from a shift to handle RDOs. See Rostered Days Off (RDO).Other
The last two fields[][] are only used for allowances or where specified. They do not need to be provided when not used. So you can use:
Start/End Period Only
As shifts can often span multiple formulas, you can optionally choose to apply only the rule that the shift ends on to the whole period. For example, for some awards, if a shift ends after 8pm, the after-8pm rate should apply to the entire shift, not just the part that was worked after 8pm. For others, if a shift starts before 6am, a rate may apply to the entire shift.Start Period Only
To enable this feature, add a ’-’ sign to the day of the shift you wish to be considered final (e.g.[WEEKDAY-] not [WEEKDAY]).
So for the following rules:
MinMax Period
A MinMax period may optionally be used in this scenario as follows:End Period Only
To enable this feature, add a ’+’ sign to the day of the shift you wish to be considered final (e.g.[WEEKDAY+] not [WEEKDAY]).
So for the following rules:
MinMax Period
A MinMax period may optionally be used in this scenario as follows:Minimum Shift Gap
Sometimes a different rate may need to be applied if there has not been a minimum number of hours between the start of the current shift and the end of the previous one. This differs from a Broken Shift as it changes the rate used and also considers shifts from the prior day when contained in the upload file. In the following example, the rate will be used for all standard hours in the shift when the shift starts within 10 hours of the end of the previous shift.020 Less than 10 Hour Gap [EVERY][10][GAP]
Overtime Conditional Shift Gap (GAPOT)
You can also require that the previous shift included overtime before the gap rate is applied. UseGAPOT instead of GAP:
020 Less than 10 Hour Gap OT [EVERY][10][GAPOT]
When using GAPOT, the rate is only applied when both conditions are met:
- The gap between the end of the previous shift and the start of the current shift is less than the configured hours (e.g. 10 hours).
- The previous shift included overtime earnings.
GAPOT rate is skipped. This allows you to define both a standard GAP rate and a conditional GAPOT rate - the engine will apply the GAPOT rate when overtime was present, and fall back to the standard GAP rate otherwise.
Both GAP and GAPOT can also be configured from Configure Smart Formulas using the Minimum Shift Gap modifier. The editor includes a checkbox to optionally require previous shift overtime.
Public Holidays
Public holidays can be enabled by setting the day to PH, for example:001 Public Holiday [PH][0000-0000]
For public holidays to be used, they must be enabled in your Smart Formula Settings and dates must be set for your organisation.
Breaks
If your data contains lines with break times these can be removed automatically by Smart Formulas.Full Example
Below is a full configuration for a Cleaning award (part-time level 1):
The above rules are applied in the following order of precedence:
- Hour periods
- Time periods
Priority is only used when two rules apply to the same line at the same time. Typically the default value works fine, but in some situations you may wish to make rules follow a specific precedence.
7.0hrs x 002 Mon - Fri PT L1 [WEEKDAY][0000-0800][][]0.6hrs x 001 Ordinary Hours PT L1 [WEEKDAY][0800-1600][][]2.0hrs x 006 Overtime < 2hrs PT L1 [WEEKDAY][7.6~9.6][][]2.4hrs x 007 Overtime > 2hrs PT L1 [WEEKDAY][9.6~24][][]
7.6hrs x 004 Sat PT L1 [SAT][0.0~7.6][][]2.0hrs x 008 Overtime < 2hrs PT L1 [SAT][7.6~9.6][][]2.4hrs x 009 Overtime > 2hrs PT L1 [SAT][9.6~24][][]
2. Assign Pay Items to Employee Pay Templates in Xero
Before setting up the pay template in Xero, the Ordinary Earnings Rate should be set for the employee (Payroll > Employees > Employment tab).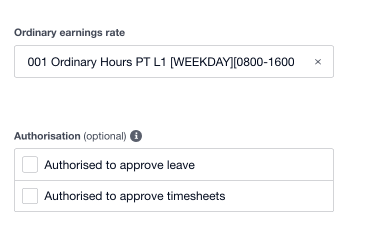
Default earnings rate for employee
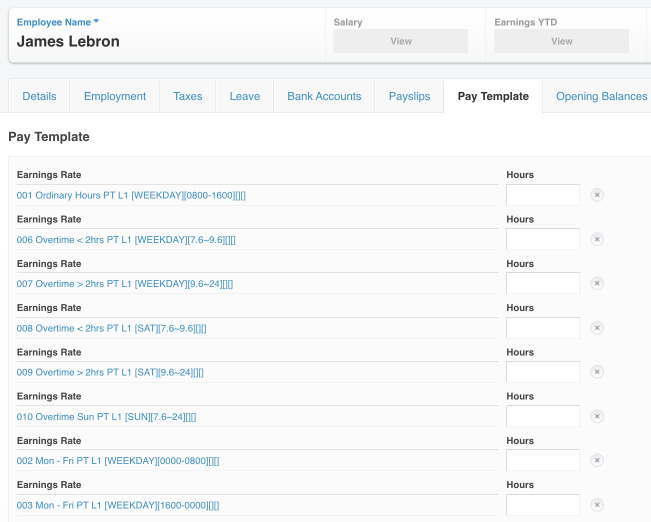
Employee pay template with Smart Formula pay items
3. Enable Smart Formulas in UpSheets
In UpSheets, select Settings from the menu, enable Smart Formulas, and confirm.If your formulas need to use public holidays, set up public holidays in UpSheets.
4. Refresh Smart Formulas from Xero to UpSheets
Select Smart Formulas from the menu. Click Refresh Smart Formulas from Xero to synchronise the two systems. Review the table to make sure all Smart Formulas have been created correctly. If any are missing, correct the name in Xero and click refresh again.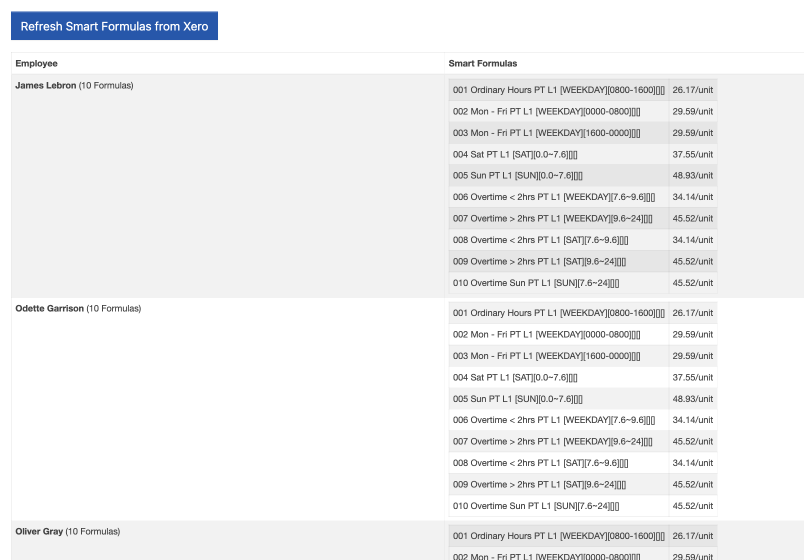
Smart Formulas synced from Xero to UpSheets
- configuration of a pay item used in a formula; or
- pay items assigned to an employee pay template.
5. Import your file using Smart Formulas
You are now ready to import files using your Smart Formulas. Select Timesheets and Use Smart Formulas on the import screen. Your file should contain:name(or another mapped employee identifier)datestart_timeend_time
start_time and end_time, set a default start time.